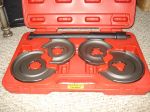
Recently we were loaned a coil spring compressor from Graftdesign to aid in our salvage efforts on a Mercedes-Benz 420 that we have. While we have yet to give it a whirl, it looks to be a good design and should make front coil spring removal a breeze.
We will have detailed photos of how this tool works later this week, but for now have a look at the photos and see for yourself.
Special thanks to Graftdesign for allowing us the oppertunity to test out this product.
Hey Rex. Any luck with the spring removal? I would be curious to see how it went.
G
Hello G,
Yes I did actually. I ended up moving the parts car onto the concrete block to keep it from sinking in the mud, since the winter snow is melting away here the ground is very soft. Anyway after that I got to work and was AMAZED at how wonderful this tool was.
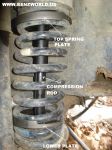
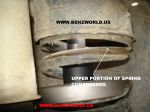
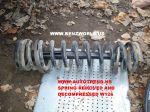
For starters let me say that you can change out your springs without even having to remove the lower control arm or the ball joints! Just AMAZING! Also they have incorporated some kind of pully/bearing system into the threaded rod that compresses the spring plates making the actual compression process easy as pie with a 1/2 ratchet and 19mm deep well socket! I was just AMAZED at how well this item worked and give it an A+ rating! While the instructions that come with the unit were not very good at all, I found that use of the "LARGE" plates is what the W126 crowd will be using. The small ones are not big enough to fit the diamiter of the spring.
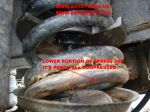
I also have found that you should possition the bottom plate about two coils up to allow room for the threaded rod to protrude. Not doing so will cause the threaded rod to bottom out on the lower control arm's spring perch. You should wind the top plate all the way up as far as possible by hand and this will give you adaquate clearance.
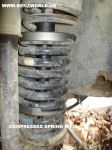
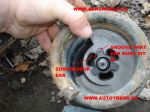
VERY IMPORTANT TO MAKE SURE THE THREE EARS ARE IN THE GROOVE WHEN COMPRESSING! NOT DOING SO COULD RESULT IN THE SPRING POPING LOOSE. This is another good reason to leave the bottom plate two coils up so you have a clear view of these ears locked into the lower plate.
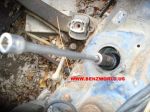
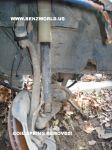
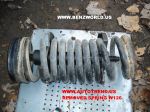
Once the spring is compressed you can lift it over the lip and pull the spring without even having to remove the lower control arm! You can also fully de-compress the spring while it is out of the vehicle by reversing the turn on the 19mm bolt.
I also made a video but I am working to edit it for the photo CD. I am going to post a few of the photos of this process for all to see.
I am also thinking about purchasing a tie-rod end remover. Seen some inexpensive ones on eBay and yet some nicer looking ones. Tearing down so many suspensions anymore that I really hate having to seperate tie-rod ends anymore.
__________________
What is to give light must endure burning -- Viktor Frankl