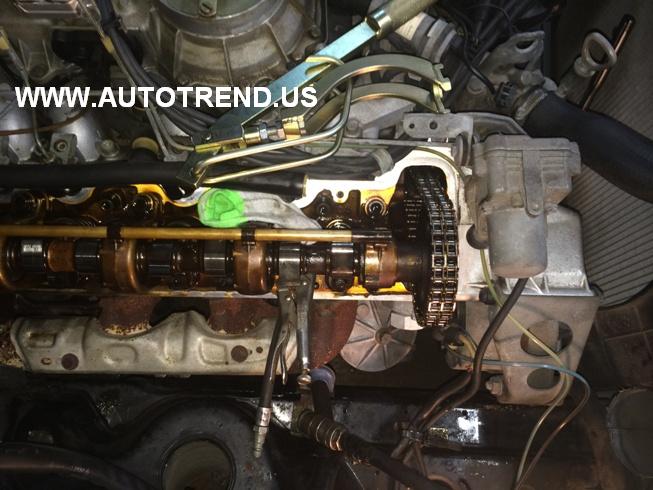
I been working to save a customers 420 SEL from the clutches of a broken timing chain guide failure, which of course wiped out the valves on the drivers side bank. Upon putting in a used 560 donor engine one is faced with the choice of what all should be done inside the "new to the car" donor engine. Of course new timing chain guides and the likes are a 100% must, and quite frankly; I just don't know how many more threads I need to put out there on timing chain guide replacement, as I have already got two or three very good ones already. What I don't have a thread on is Valve Seal replacement.
It's no secret that old, dry and hardened seals just let the oil roll down the stem and into the combustion chamber. That said I have elected on this "new to the car" donor engine, that I will install new valve seals. This job is being done with the heads "On the vehicle" and I can not stress enough how risky this procedure is... One mistake could land the valve in the combustion chamber FORCING you to have to remove the heads! If that isn't enough to scare you off, then maybe this will - "DO NOT PERFORM THIS JOB AT HOME - AND IF YOU DO, YOU ARE DOING SO AT YOUR OWN RISK!". That's right, this process is so touchy feely plus risk and danger follow you at every turn (no pun intended). Can't say that I would want to walk anyone thru this kind of task, however if you are curious how it's done, then keep reading! Just know that unless you are paying me to do this job, it's your problem if you mess up - AND ITS VERY EASY TO MESS THIS UP.
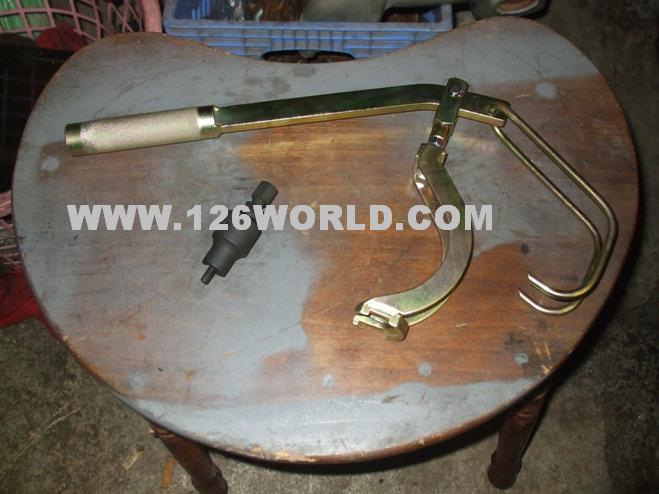
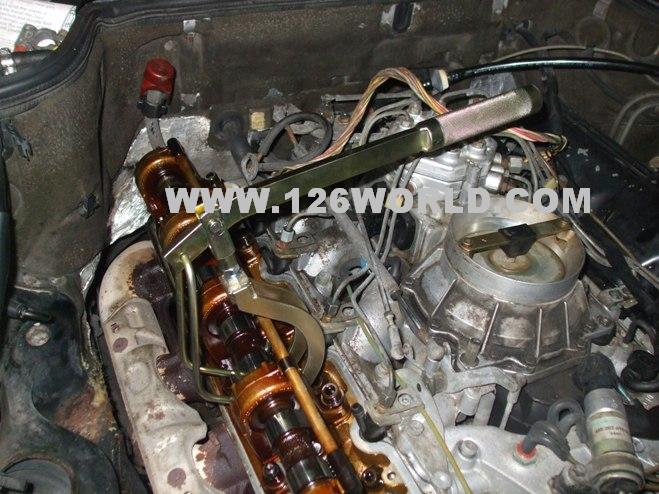
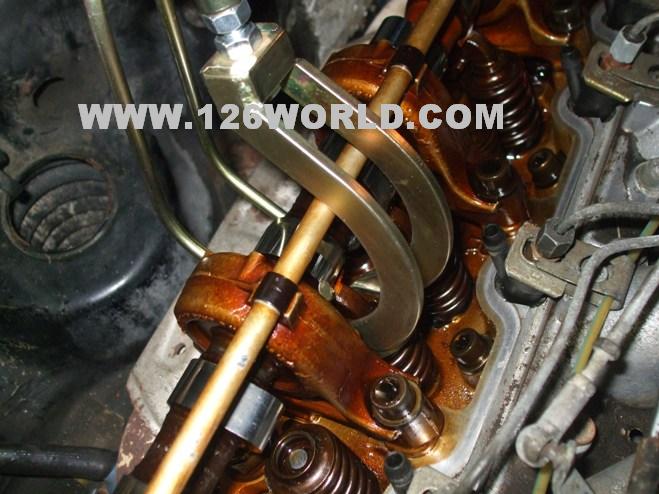
To compress the spring you will need a valve spring compressor tool much like the one shown above. It's the gold looking tool with the lever and hooks. If you don't have this tool, you won't be able to perform this job, it's as simple as that. They are fairly inexpensive and sold online just about everywhere. You will also need a professional series air compressor, and attachement to screw into the spark plug hole to fill the cylinder with air and an extra set of steady hands. Of course there are other various hand tools, but one would expect anyone taking on this kind of job should have them handy, wrenches, sockets, breaker bar, ect.
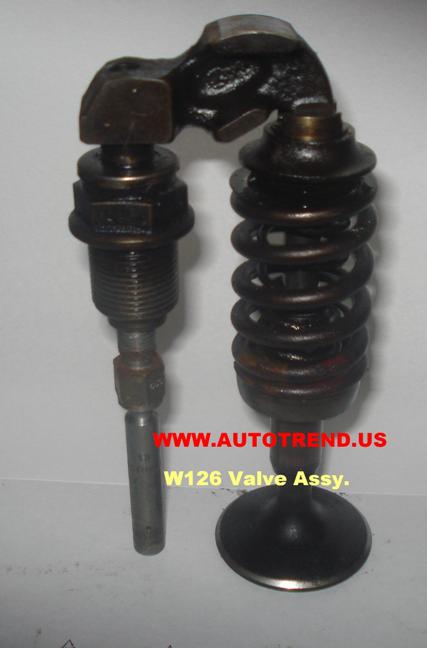
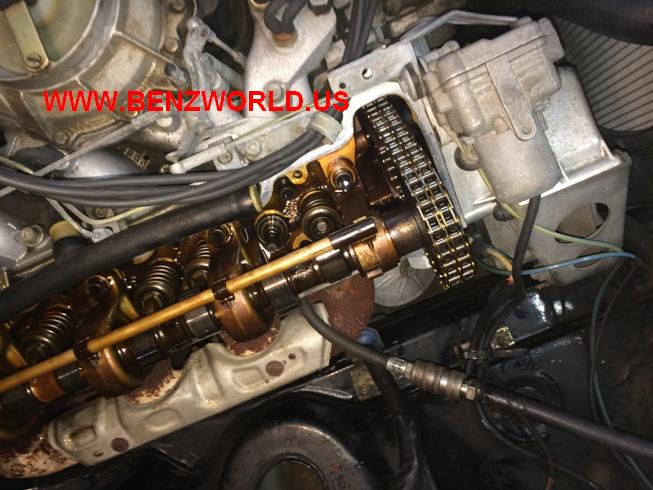
I'll start the job assuming you have already pulled the air cleaner, valve covers, spark plugs and have clear access to your first set of valves. Since doing one set of valves is no different than the other 7 sets I'll just focus on one set, and you would repeat the process 8 times on each cylinder. One set of valves has two valves, both in the same cylinder. You can tell which one is which by looking at them. The valve right infront of the exhaust manifold is of course the exhaust valve. Both seals are the same, so there is not a seperate intake or exhaust seal. To get a better idea of the valve train before I have these images I have used in other threads to help get your head around the whole inner workings.
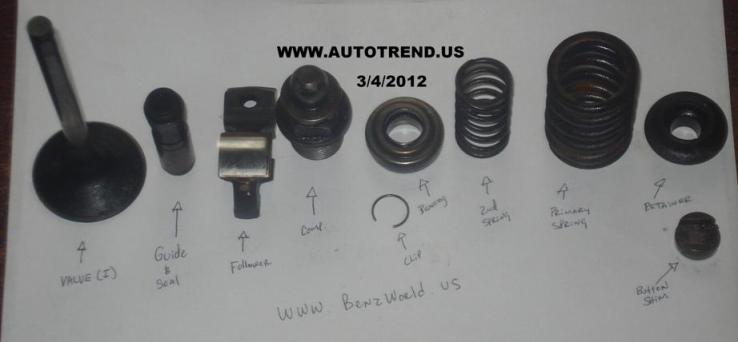
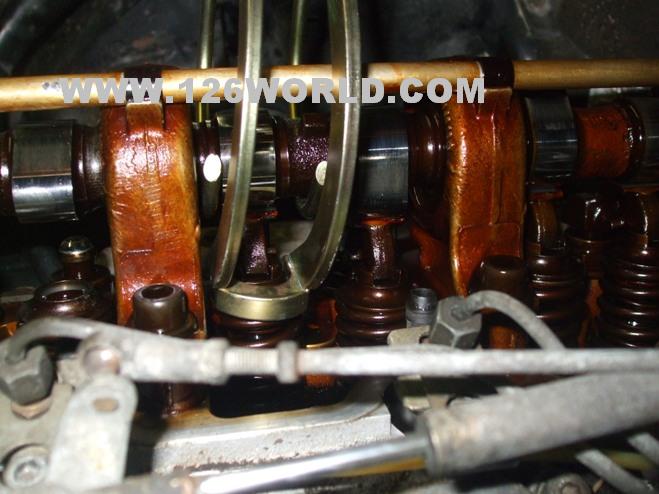
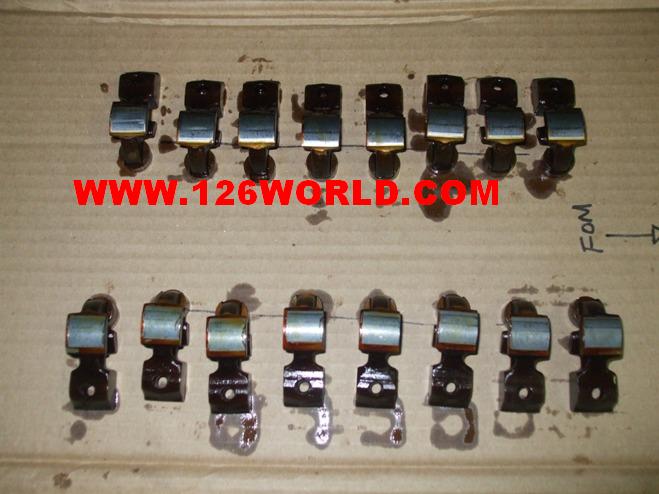
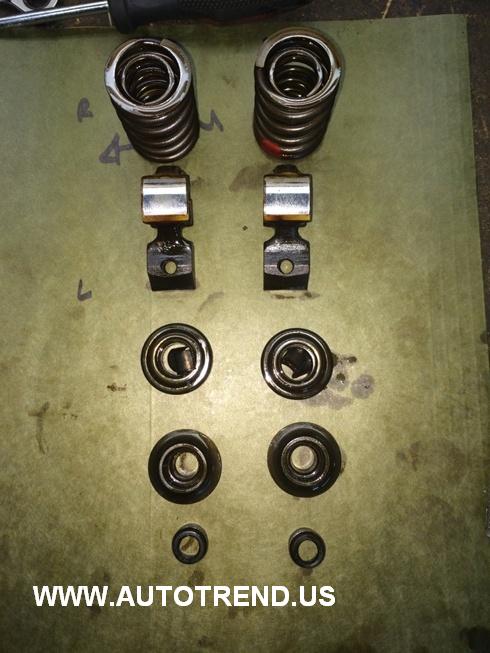
These componets above make up the valve train. We are only going to be focused on pulling off the followers, button shim, keepers, retainers, springs, valve seal and valve rotator bearing.
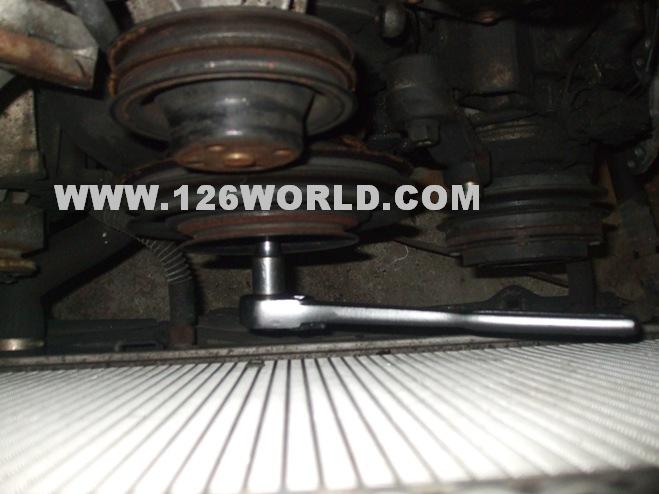
You must start by putting a 27mm socket on the lower crankshaft bolt and turn the engine so that the cylinder you are working with has it's piston all the way at the bottom. NOTE! YOU KEEP PISTON AT THE BOTTOM ONLY WHEN REMOVING FOLLOWER! YOU MUST KEEP PISTON AT THE TOP WHEN YOU REMOVE THE LOCKS, RETAINER AND SPRINGS! Also note - Turning the engine is much easier if all the spark plugs are removed.
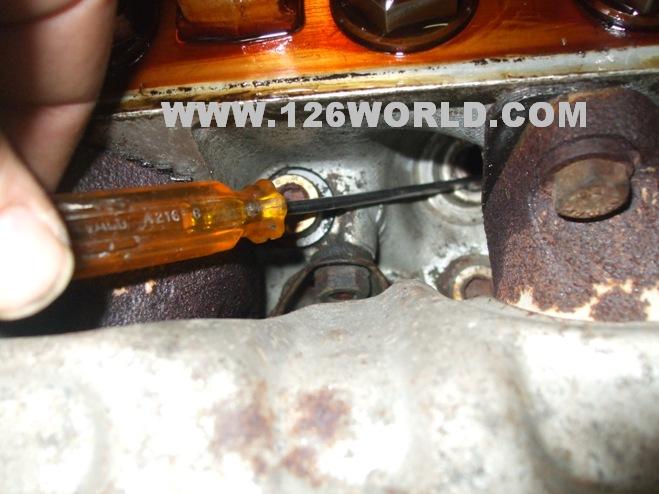
On each cylinder you can get an idea when the piston is at the top or bottom by looking at the cam lobes. You can make sure the piston is at the top or bottom by sticking a skinny screwdriver in the spark plug hole. If it's at the top it wont go in very far, like in the photo above.
The next step is to get your valve spring compressor tool in possition as shown above. IT IS VERY IMPORTANT YOU KEEP ALL OF THE BUTTON SHIMS AND FOLLOWERS IN ORDER! THEY MUST BE USED IN THE EXACT SAME PLACE WHEN YOU RE-INSTALL! You can remove all of the followers now, that way they say in order, and you dont have to keep moving the piston up and down as you move from group to group.
NOW IT"S TIME TO MAKE SURE THE PISTON IS ALL THE WAY AT THE TOP. Once you do this it's time to screw in your pressure hose to the spark plug hole of the cylinder you are working with. With your second set of hands, entrust him/her with holding the crank bolt from turning by placing a breaker bar on the 27mm crank bolt. The engine will want to spin once you put pressure in the cylinder, so its best to have a breaker bar rather than a ratchet incase it kicks back. The air does not put much force on the bar, but its quick and must be held in position during this very unforgiving procedure.
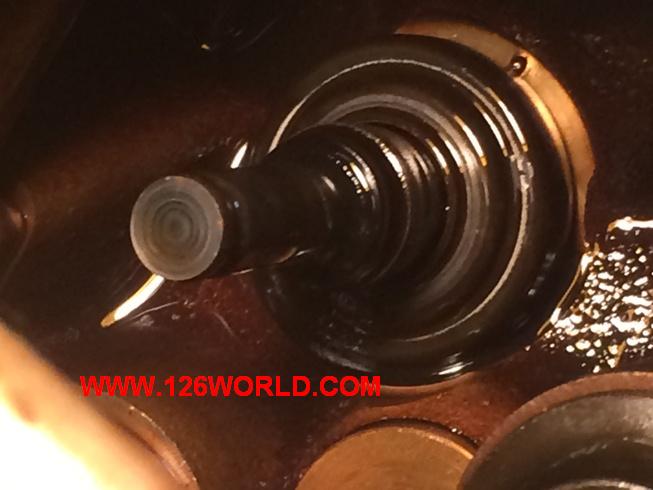
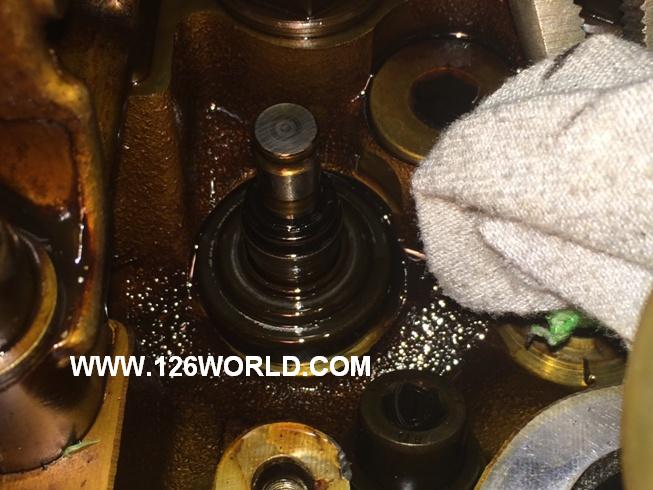
Once he/she has a firm grip on the breaker bar, pressurize the cylinder with air. Re-set your valve spring compressor on one of the two valves. This is where it becomes very touchy-feeley, as when you are compressing the spring you have to break the intial gunk-seal, so that the valve stays closed from the air pressure, allowing the spring to be depressed to gain access to the locks. It's somewhat of a small rocking motion - but you will know its free once the spring moves down and the valve stays still; exposing the valve locks. Once you see the valve locks use a pen magnet to suck the valve retainer locks out. From here you carefully remove the valve spring compressor, as it will be somewhat of a tight fit now that the spring is decompressed and un-sprung. Once you have the retainer removed the tool slides out and you can remove the two springs and finally see the valve seal.
Regardless if you remove all the followers at the start, or if you do them two at a time; the important parts is that you KEEP EVERYTHING IN EXACT ORDER!
You will now do the same exact thing on the other last remaining valve in the cylinder you are working with. I like to take a sock, or thick cotton rag and wrap the valve stem, then using vice grips; lighlty clamp the stem to ensure that should things go south on the final spring removal, it can not fall into the cylinder. Because gawd forbid your second set of hands had too much to smoke/drink, or in my case; is 12 years old. That should put in perspective the relatively small effort that is needed to hold the engine while one cylinder has 90-120 PSI of pressure.
Keep in mind that the air pressure is what keeps the valve from falling, so unless the piston is all the way at the top, or you have the valve held with locking pliers - IT WILL FALL INTO THE ENGINE! Once both springs are removed, and the piston is at the top; you can release the pressure and the piston will prevent the valves from falling thru, but be careful because it doesn't take much to push that piston down, and there goes the valve.
You will want to use a small pry bar to remove the old seal. It should pry up easy.
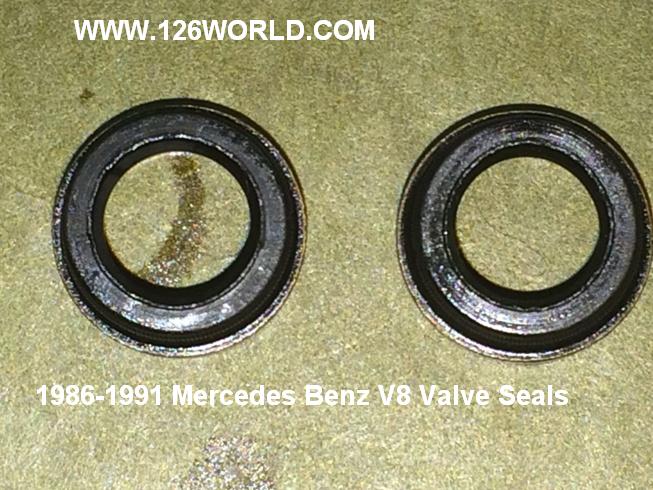
I guess now is as good a time as any to talk about valve seal quality. I have not been too impressed with the Elring seals... Mercedes Benz part number for the valve seals is 1170500267, but often times Elring sells them under this number too. I ordered some from Mercedes and I hope they have a little better fit as I'm not 100% sold on the Elring offering. The Mercedes Boxed parts may very well be Elring too, but I am hoping they are not.
Ill polish this thread up a bit later, it's getting late.
__________________
What is to give light must endure burning -- Viktor Frankl
Thank you very very much for posting these instructions. I did try it at home and was able to replace the valve seals very carefully. Don't think I could have done it without your description of what to do and the engine manual my wife gave me!!
I found some wear on the followers so have to figure out what to do about them now.....
-- Edited by NigelP on Thursday 19th of September 2019 09:20:24 PM
-- Edited by NigelP on Thursday 19th of September 2019 09:40:43 PM
Hello and thank you for the kind words, it's greatly appreciated!
With regards to the followers, changing them will require the proper thickness "button shim" as I like to call them. There is a go-no-go feeler gauge that is required to determine if you're in the ballpark. Some guys will just try rolling with the old shim but you could find yourself having to pull the valve cover off if it's not the proper specs. You know this by it ticking or possibly having valve lash issues.
__________________
What is to give light must endure burning -- Viktor Frankl